Monday, 18 February 2013

Connecting the Bluetooth Keyboard with Windows 8


Windows 8 Consumer

*This fix was tested on my Asus Slate ep121, 60gb ssd with Windows 8 Consumer Preview Build 8250 and the Microsoft Bluetooth Mobile Keyboard 6000
Before I begin if you have not yet done so I suggest you address the Bluetooth driver issues if you have an ASUS slate ep121 and are trying Windows 8 Consumer Preview. You can see the fix here.

Connecting the Bluetooth Keyboard that comes with the Asus Slate ep121 is a fairly simple task, but people have been reporting problems getting it connect as there is a little trick to it.

Instructions:


Step One:  Swipe your finger from the right hand edge of the screen and click ‘Search’, Type in and Select ‘Bluetooth Suite’.
Step Two: Now flip over your keyboard and turn it off and then back on. After a few seconds press and hold the Bluetooth button until the green light on the front of the keyboard is blinking red and green.
Microsoft Bluetooth Mobile Keyboard 6000
Step Three: Now that you are in the Bluetooth Device menu, click ‘ Add a Device’ and your Bluetooth keyboard should appear under the name ‘Bluetooth Keyboard’ or ‘Bluetooth Mobile Keyboard 6000′. Select it and it should begin to connect.
Step Four: Your Windows 8 machine should now prompt you for a password. Enter 0000 and hit enter on the computer (That’s four zeros). Now do the same on your Bluetooth keyboard (Press 0000 and enter). It should now successfully pair up with your computer.
Step Five: Win!

That’s it. Now onto the hardware keys. At this time I am unsure if anyone has the G-Sensor working, but I do know of a manual way to rotate your screen. If all else fails I may try to code a program to force rotation if I am able.
Thanks for reading, and enjoy your new Windows 8 Consumer Edition! If you have any other bugs to report, please use the contact form and I will see if I can help out

How to Read Blackberry® BBM messages without notifying the sender.


I know each and every Blackberry® user has had this or a similar scenario happen to them. You get a BBM from someone that you either don’t have the time to respond to, are ignoring, or just don’t feel like messaging back at the time, but you really want to see what the message says. The problem is, if you open that message it will notify the sender that you have, in fact, read the message by changing the ‘D’ for delivered to an ‘R’ for read on their phone. This easy little detour will allow you to read the full message without changing the status of the message on the senders end.
To view the message without them knowing, perform this trick:
Part One – Enable BBM History.
1. Open your BBM and click the Blackberry button   and select ‘Options’
2. Scroll down to the bottom of the option menu and enable ‘Save Message History’
3. Click the Blackberry button again and ‘Save’.
Part Two – The Detour
1. Open your BBM Messenger again and highlight the person who sent you the message that you want to read, click the Blackberry button and select ‘View History’.
2. Select today’s date and read the last message sent!
This will not a) notify the person that sent you the message that it’s been read, and b) will not remove the notification that you have a new message so you still know you still have to respond to it.
Now for some blurry video!
*This was tested on two Blackberry Curve 8530′s running BBM 5.0.0.

Legal Disclaimer: The Trademark BlackBerry® is owned by Research In Motion Limited and is registered in the United States and may be pending or registered in other countries. Fixitts.com is not endorsed, sponsored, affiliated with or otherwise authorized by Research In Motion Limited.

Make Your Own Messenger :)


Guys in todays post i gonna show you a video that how to make your own messenger of your own it works.
listen there are some points to work with it mind them while working:-
1. Turn off your and host(to whom you are going to talk) firewall-
2.Make this notepade file on both computers
3.For connecting know the host ip address
for home users+=
4. If using a router then the command is ipconfig type this in your cmd .
5.If you are using a modem in your home network then go on the site www.whatismyipaddress.com
6.And follow the vedio instructions the code is :-
@echo off
:A
cls
echo MESSENGER
set /p n=user:
set /p m=Message:
net send %n% %m%
pause
Goto A


if you are not typing pause then you can do it continuously.............


Sunday, 17 February 2013

HOW TO HANG A PC USING .bat FILE


things which are shown in this vedio are really working but remember one thing while making a . bat file to hang your computer use pendrive so you can remove when you wants to stop the proccess. its g8 try it out.
it is my advice to you all while making change in firefox browser make the changes care fully it really works you will feel the diffrence.
happy learning visit again 

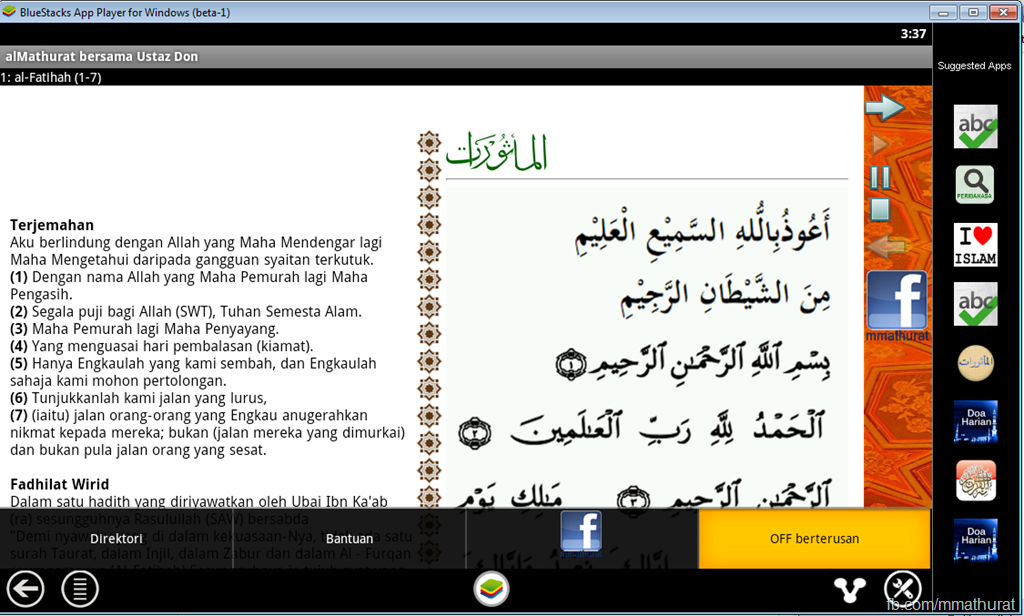
Running Android Apps on BlueStacks–Apps player for PC (Windows)

This is a good initiative for Android developer to test their Android apps should they do not have an Android device (an alternative to the boring official Emulator). The App Player is an effort by BlueStacks, they actually got funded for this idea and won the Best Innovation Award in CES 2012.
This application also useful for no-developer, to play Android apps on their PC. I personally use PULSE on the BlueStacks.
STEP1: Installing BlueStacks App Player
Your PC needs at least 1GB RAM, if you have less the installation will actually stop.
Download the installer here http://bluestacks.com/

 After the download completes, find the installer file and execute.  

Click Next.
image 
Choose Install.


Wait for a while.


Find the “Start BleuStacks” on the Windows button


Wait again for the BlueStacks App Player to load.
 Your email and click Next. 
 Ready to play an Android Apps.


STEP 2: Running your APK
If you do not any APK file, try download this –> http://bit.ly/m-mathuratkuis .
After the download finish just double click (alMathurat bersama Ustaz Don.apk). Your Windows supposedly recognise the APK file and associate it to the BlueStack App Player.


And, voila!!! Have fun…
Should you’d like to play your own Android apps, try locate the APK file in the bin forlder of your Android project. Normally all the project folders are in the folder called workspace.


Friday, 1 February 2013

Kaspersky Internet Security 2013

Kaspersky Internet Security 2013 with keys


Kaspersky Internet Security 2013 – the backbone of your PC’s security system, offering protection from a range of IT threats. Kaspersky Anti-Virus 2013 provides the basic tools needed to protect your PC.
Kaspersky Internet Security 2013 – the all-in-one security solution that offers a worry-free computing environment for you and your family. Kaspersky Internet Security 2013 has everything you need for a safe and secure Internet experience. Kaspersky Internet Security 13.0 – is a new line of Kaspersky Labs products, which is designed for the multi-tiered protection of personal computers. This product is based on in-house protection components, which are based on variety of technologies for maximum levels of user protection regardless of technical competencies. This product utilizes several technologies, which were jointly developed by Kaspersky Labs and other companies; part of them is implemented via online-services. Our products for home and home office are specifically designed to provide hassle-free and quality protection against viruses, worms and other malicious programs, as well as hacker attacks, spam and spyware.


Download Kaspersky 2013 setup from here  ( Skip Add)

Password = Softcrackerz


91 days key -4GGYH-S7HEJ-QEGXT-4C88H working 100 %
 

How to get Whatsapp license for 10 years

How to get Whatsapp license for 10 years for All Smartphones Phones


A big loophole has been found out using which you can upgrade your Whatsapp license for a period of 10 years . This is true I have tested it on a few numbers and devices . It is working and 10 years of license . So why wait follow the below tutorial to get your Whatsapp License upgraded for free.
Originally Whatsapp license requires $0.99/year . So the following tutorial will help you to save a lot of $$$. Note : If jailbreak iPhone you can download Whatsapp from Installous for free , else you have to pay and buy Whatsapp from Apple Store for 1$ and perform the below trick.

Gadget Required :

  1.  iPhone or iPad.
  2. Android phone with Whatsapp phone number which license has to be upgraded.

How to go about ? 

  1. On your iPhone install Whatsapp and register the number with Whatsapp of that number whose license has to be upgraded.You need not switch the sim , just enter the number. You should have a working Data plan or a Wi-Fi.
  2. When you register via iPhone you will get a 3 Digit Security pin on your registered number(registered number must be switched on) .
  3. Now install Whatsapp on your Android Phone and register it with the number which you have used in iPhone for registering. Complete the registration process on your Android Phone by following the same steps as given above.
You can now go to Whatsapp main menu>Settings-Account>Payment info and look for Service Expiration Date.

Update : This Trick has stopped working now . Though it still works for a few people and specific countries.